Getting Started on Meta Quest
Learn to view content on Quest devices and collaborate with others on PC, Mac, iPad, or Quest.
Introduction
Campfire supports Quest 3, Pro, and 2. If you have your Quest device handy, open the app and click on Get Started. Spark, a virtual assistant, will guide you through a fun and interactive tutorial designed to get you started in a few minutes. We highly recommend it!
You can also watch this quick tutorial video of Spark walking through the tools:
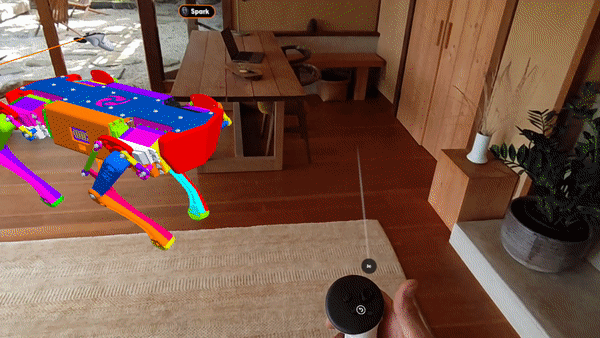
Viewing models
When you open the Campfire app on a Quest, you’ll be in passthrough mode by default. Once you’ve logged in, you’ll be presented with project list view. By default, all users have a list of sample projects that show how Campfire can be used for design reviews, training, and troubleshooting.

Go to the project and scene you want to view.
When others are also viewing a scene, you’ll see them represented by either a rectangle (if they’re using a PC, Mac, or iPad) or a generic head (if they’re on a Quest). You’ll also see their name under the rectangle or head, so you’ll know who’s in the scene and exactly what they’re looking at.

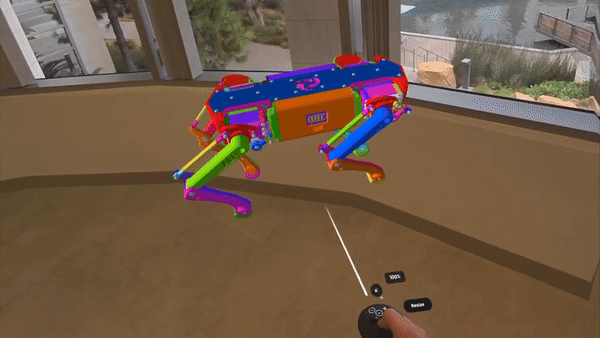
Using the controller
Campfire requires only a single controller for use on the Quest. You can use either the left or right controller and can switch between them at any time by pressing any button. To click on a button or select, point your controller and click on the index trigger.

Universal menu
When you start the app, the menu is minimized to just the grab handle which will follow you as you move around. Click on the grab handle to expand the menu. You can now move it out of the way by grabbing the handle at the bottom and placing the menu in a convenient position.

The layout of the menu is consistent across all Campfire devices. You’ll see the scene list and model hierarchy on the left, content in the middle, and the inspector on the right. Scenes that you composed earlier on a PC, Mac, or iPad will show in the scene list.
Compatibility
Note: If a model is not optimized for Quest, performance may be poor depending on model complexity. Please open the Campfire app on a PC, Mac, or iPad to optimize the models.
Select the model and then go to the inspector view, click on Compatibility, toggle the devices you’re going to use, and click on Start Processing. It may take a few minutes to complete before you can view them.

User modes
A user can take on Presenter mode. As presenter, you can switch scenes and interact or manipulate the models with a range of tools. Typically, a presenter guides the design review presentation or training session and is the only one who can change scenes. If a user is a presenter, a yellow dot appears above them.

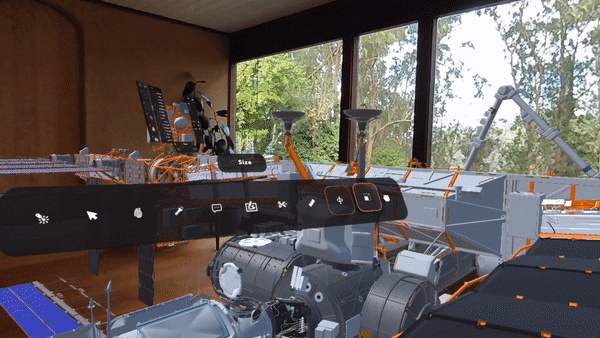
Using tools
As presenter you have access to a range of tools to guide the flow of the presentation. Press and hold the B button (or the Y button if using the left controller) to bring up the toolbar. Hover over the tool you want to select for a second, then release to select the actual tool.

Controls
B / Y: Hold to open toolbarA / X: Tool optionsIndex Trigger: Activate toolThumbstick: Adjust tool
Laser
Press the index trigger to activate the laser.

Comment
Hold and drag the index trigger to place a comment, then type out your comment.
You can also click on a comment to resolve, edit, or copy a link to it.

Sketch
Take a snapshot of the model with the index trigger and then hold down the index trigger to make a sketch.
You can also click on a sketch to resolve, edit, or copy a link to it.
Slice
Hold down the index trigger and move the controller to slice through the model.

Explode
Move the thumbstick up and down to explode.

Zoom
Grow and shrink the selected model
Grab
Point at a part of the model and hold the index trigger to grab.
Sharing
You can easily share a project with other Campfire users by adding their email address. Click on the Share button to add the emails of other Campfire users you would like to share the project with.
1. Inside the project, open the universal menu and click on the Share button in the top right corner of the universal menu.

2. Input the email of the user you want to share with and press the Send button

You can also share the project with a user who does not already have a Campfire account. The user will be prompted to create an account and download Campfire before they can view your project.
In-Room Collaboration (Preview)
Once you’ve shared your project, you can use In-Room Collaboration to work on projects with others in the same physical room.

Next Steps In-Room Collaboration (Quest Preview) Optimizing for Quest & iPad